In this article
Most creators assume you need to show your face to build an audience. You don’t.
Faceless content — videos, posts, and audio created without your face on camera — is a legitimate production model used by thousands of channels and accounts across YouTube, Instagram, and TikTok. Some of the highest-performing content on those platforms never shows a human face at all. The model works. What most people get wrong is the workflow.
This guide breaks down what faceless content actually is, what tools you need to produce it, and the step-by-step process for getting your first piece out without spending weeks on setup.
What You’ll Need
- A topic or niche you can research and explain clearly
- A screen recorder or video editor (CapCut, DaVinci Resolve, or similar)
- An AI voiceover tool if you don’t want to use your own voice (ElevenLabs or a free alternative)
- A free account on YouTube, Instagram, or TikTok (start with one platform)
- A content bank or at least 5 topic ideas written down before you start
- 2–4 hours for your first production session
Step 1: Define What “Faceless” Looks Like for Your Format
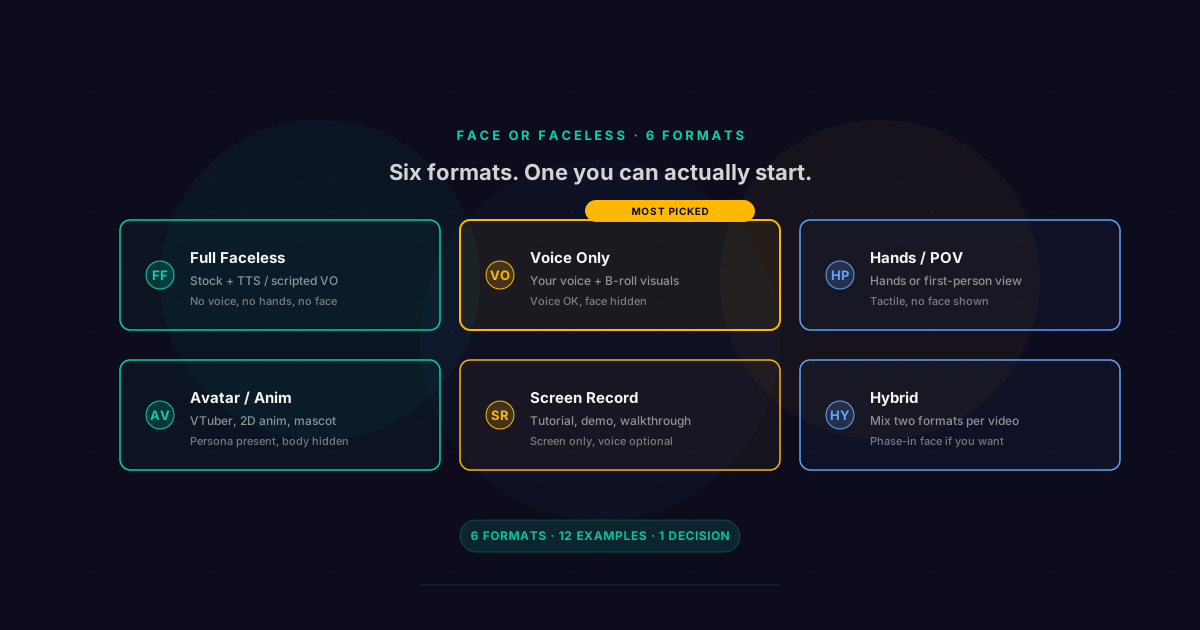
Faceless content is not a single format. It is a constraint applied to any format. Understanding which format matches your niche determines the tools you need and the workflow you follow.
Screen recordings. The camera points at your screen, not your face. You walk viewers through a process: a software tutorial, a financial breakdown, a research walkthrough. Most popular in tech, finance, education, and productivity niches. The production floor is low — a screen recorder and a voiceover is everything.
Stock footage + voiceover. You source video clips that illustrate your topic, cut them together, and narrate over them. Works for travel, history, documentary-style, and motivational content. B-roll sourcing is the skill requirement here. Storyblocks and Pexels are the two most commonly used libraries.
Text-overlay video. Static or animated text on screen, paired with background music. Most common on Instagram Reels and TikTok. Lower production complexity than voiceover formats. Works well for tips, quotes, listicles, and “this or that” content.
Hands-only or POV. Your hands appear on camera but your face does not. Effective for cooking, unboxing, product reviews, and craft content. No voiceover required if the visual speaks for itself.
AI-generated visuals. Image-to-video tools or AI animation produce the visuals; you provide the script and voiceover. Newer format with lower stock quality but improving fast. Worth testing in niches where perfect visual fidelity is not expected (storytelling, abstract topics, motivational content).
Pick one format that matches your niche and production capacity. Do not try to blend multiple formats in your first batch — you will spend more time managing the production complexity than publishing anything.
Step 2: Choose One Platform and One Niche
Faceless content works across YouTube, Instagram, and TikTok. Each platform has different format requirements and audience expectations. Starting on all three simultaneously is a mistake almost every new creator makes.
YouTube. Best for long-form educational content (8–20 minutes), tutorials, and evergreen search-driven content. The highest average ad revenue per thousand views of the three platforms. Slower growth curve but more durable traffic. If your content requires explanation depth, start here.
Instagram Reels. Best for 15–90 second clips. Discovery algorithm is aggressive — content can reach non-followers quickly. Strong for motivational, tips-based, aesthetic, and product-adjacent content. Shorter production time per piece but requires higher volume (typically 3–5 posts per week) to compound.
TikTok. Best for fast-moving trends, voiceover commentary, and niche community content. The algorithm rewards consistency and early engagement signals more than production quality. Faceless content performs well here because TikTok audiences are accustomed to text-overlay and screen-recording formats.
For niche selection: match your topic to the platform where similar content already gets traction. If you search “faceless [your niche] channel” on YouTube and find active channels with healthy view counts, that niche-platform combination is validated. Do not pick a niche because it feels original — pick one where an audience already exists and is underserved.
Step 3: Build a Minimal Tool Stack
You do not need an expensive setup. Every tool category has a free or near-free option that is good enough to start.
| Tool Category | Starter Option | Upgrade Option |
|---|---|---|
| Screen recorder | OBS Studio (free) | Loom, Camtasia |
| Video editor | CapCut (free) | DaVinci Resolve, Premiere |
| AI voiceover | ElevenLabs free tier | ElevenLabs Starter ($5/mo) |
| Stock footage | Pexels (free), Pixabay | Storyblocks ($15/mo) |
| Thumbnails | Canva free | Canva Pro ($15/mo) |
| Script writing | Google Docs (free) | Claude, ChatGPT |
The most common tool mistake is paying for three AI video generators before publishing a single piece of content. Buy tools when you know which part of the workflow is the bottleneck, not before. Your first 10 pieces of content will reveal what actually slows you down. Until then, the free tier is enough.
One tool to prioritize early: your voiceover solution. Viewers will tolerate average video quality. They will not tolerate distracting audio. If you plan to use AI voiceover, test 3–4 options before committing — the difference in naturalness between ElevenLabs, Murf, and the built-in CapCut voice is significant. If you use your own voice, invest in a $40–60 USB microphone before anything else.
Step 4: Write a Script Template and Use It Every Time
The biggest production bottleneck for faceless creators is scripting. Most people approach each video like it’s a new creative project. That’s wrong. Treat scripts like a fill-in-the-blank template.
Every video format has a repeatable structure. For an educational tutorial on YouTube, that structure is:
- Hook (first 30 seconds): State what the viewer will know by the end. Make it specific. “By the end of this video, you’ll have a working 5-video content bank ready to publish this week.”
- Context (60–90 seconds): Why this matters. Address the problem your viewer came to solve.
- Main content (bulk of the video): The step-by-step breakdown, with each step clearly labeled and explained.
- Recap (60 seconds): Three sentences max. What they learned, what to do next.
- CTA (30 seconds): One action. Subscribe, comment, click the link in the description. Never more than one.
Write this template in a Google Doc. Give each section a header and a word-count target. When you sit down to script, you are filling in the template, not starting from scratch.
Want the production system behind these channels? The Complete Channel Launch Pack gives you 10 channel blueprints, setup prompts, thumbnail concepts, and a 30-day starter plan so you can start from a picked channel instead of a blank page. Get it for $9 →
A good script template for a 10-minute YouTube video runs 1,200–1,500 words. For a 60-second Reel or TikTok, 150–200 words. Set those targets in the template header so you know when you have enough.
Step 5: Produce Your First Batch in One Session
Do not produce one video and then wait to see how it performs before producing more. Produce four to six at once.
Batch production eliminates the setup-teardown cost of switching between “scripting mode” and “production mode.” When you open your screen recorder to produce one video, you spend 15 minutes configuring your setup. When you stay in production mode for three hours, you spend those 15 minutes once and keep the momentum.
A first-session batch plan:
- Scripts ready: 4 (written before this session, not during it)
- Session time: 3 hours
- Deliverable: 4 recorded voiceovers or screen recordings, unedited
Do not try to script, record, and edit in the same session for your first batch. Scripting and recording happen in one session. Editing and thumbnails happen in a second session. Splitting the sessions reduces cognitive load and improves the quality of both.
For screen recordings: record at 1080p minimum, 60fps if your machine supports it without lag. Set your desktop to a clean, dark background before recording. No notification popups. Close every application tab not relevant to the recording.
For voiceover: record in a quiet space with consistent audio conditions. Read the script twice for each section — the second take is almost always better. Label each file by script name and take number before moving to editing.
See the full faceless content strategy guide for the 4-video afternoon workflow and how to maintain batch production beyond your first session.

Step 6: Edit, Thumbnail, and Publish Without Overthinking
Most faceless creators over-edit their first videos. Cut content until it’s tight, add a few visual elements, and publish. You learn more from one published video than from 10 hours of additional editing.
Editing checklist for a faceless video:
- Dead air removed (long pauses, filler “ums,” silence between sections)
- B-roll or screen activity present for every voiceover section (viewers need something to look at)
- Title card or intro graphic in the first 5 seconds
- Text labels or callouts on key points
- Background music at 10–15% volume (audible but not distracting)
- End screen with one CTA (subscribe button or next video link for YouTube; comment prompt for short-form)
Thumbnail principles for faceless content:
No face means the thumbnail carries more visual weight. Use bold text, high contrast (dark background with teal or amber text works well), and a clear number or promise. “7 Niches. Zero Face. Real Revenue.” outperforms a generic AI-generated background every time. Canva’s free tier is enough for this at scale — create one template and swap the text per video.
Publish without waiting for perfect. YouTube’s Creator Academy guidance on publishing cadence is explicit: consistent publishing beats sporadic high-quality output at every stage of channel growth. Your second video will be better than your first. Your tenth will be better than your fifth. Publish and learn.
Common Mistakes
1. Picking a platform based on personal preference, not audience fit. Faceless cooking content performs differently on YouTube (long-form tutorials) versus Instagram (short aesthetic clips). Research where your target audience already consumes faceless content before choosing.
2. Scripting and producing on the same day. Scripts written and recorded on the same day are almost always longer than they need to be. Write scripts 48 hours before recording so you can cut them before you record, not after.
3. Using one AI voice for everything. Different formats need different vocal energy. A calm, instructional voice works for tutorials. A higher-energy delivery works for hooks. Most AI voiceover tools let you adjust pace and tone. Test the settings before committing to the default.
4. Skipping the content bank before launch. Publishing your first video before you have 4–6 more scripted means you will be improvising under deadline pressure by week three. The content bank guide covers how to build 30 days of runway before you need it.
5. Trying to repurpose across all platforms without a repurposing plan. One YouTube video does not automatically become a good Instagram Reel. It requires format-specific editing (vertical crop, shorter cut, subtitle overlay). See the content repurposing guide for the workflow that makes cross-platform publishing efficient instead of exhausting.
Frequently Asked Questions
What is faceless content?
Faceless content is any content — video, audio, or text-based — produced without showing the creator’s face on camera. Formats include screen recordings, voiceover videos with stock footage, text-overlay social clips, hands-only demonstrations, and AI-generated visual content. The creator’s identity is separate from the content itself. The content builds an audience around a topic or niche rather than around a personal brand.
Is faceless content still effective in 2026?
Yes. Faceless content performs well across YouTube, Instagram, and TikTok when the niche is specific and the production quality meets the baseline for that platform. The model is more competitive now than it was in 2022 or 2023, but most niches still have room for a new creator who publishes consistently and picks topics with real search demand. The advantage faceless creators have is speed — production is faster, batching is easier, and the workflow is more repeatable than on-camera content.
Do I need to use AI tools to make faceless content?
No. AI tools accelerate production but are not required. Screen recordings need only a recorder and a script. Stock footage videos need an editor and a voiceover. Text-overlay Reels need a phone and Canva. AI voiceover tools like ElevenLabs reduce the barrier for creators who don’t want to use their own voice, but many successful faceless channels use the creator’s voice throughout. Start with free tools and add AI tools when you identify a specific production bottleneck.
How long does it take to produce faceless content?
For a 10-minute YouTube video: scripting takes 60–90 minutes, recording takes 30–45 minutes, editing takes 90–120 minutes. Total: roughly 4 hours for a complete video. For a 60-second Instagram Reel using the same script: scripting takes 15–20 minutes, recording takes 10 minutes, editing takes 20–30 minutes. Total: roughly 1 hour. Batch production cuts the per-video time significantly once you have a template — see the 4-video afternoon workflow for how to produce four videos in one production session.
What kinds of faceless content make money?
YouTube faceless channels monetize through ad revenue (once you reach 1,000 subscribers and 4,000 watch hours), affiliate links embedded in descriptions and pinned comments, and direct product sales. Instagram and TikTok faceless accounts monetize through brand deals, affiliate links in bios, and TikTok Shop commissions. The highest-earning faceless niches tend to be finance, technology, and education — primarily because CPM (ad revenue per thousand views) is higher in those categories. The faceless UGC content guide covers a separate income path: getting paid by brands to create ad content without showing your face.
Keep Reading
- Faceless Content Strategy: The System for Consistent Publishing — the batching workflow and 90-day planning system once your production process is working
- How to Build a Faceless Content Bank — build 4–6 weeks of scripted content before you need it
- How to Repurpose Faceless Content Across Platforms — turn one YouTube video into Instagram Reels and TikToks without starting from scratch
- Faceless UGC Content: Get Paid Without Showing Your Face — the paid creation path for faceless creators building a client-based income
What to Do Next
You picked a model. Now ship video 1. Concrete sequence beats more research.
Get the Video 1 Plan Worksheet
6-section worksheet: idea, script outline, scenes, voice, thumbnail, upload day. 40 minutes of focused work and video one is recorded. Free PDF.
Free. No spam. Unsubscribe anytime.
Take the 2-min Quiz
Get matched to a model that fits your time, voice tone, and topic. Then use the bridge into a production kit.
Start the QuizComplete Channel Launch Pack
10 channel blueprints, setup assets, thumbnail prompts, and the starter plan in one bundle.
$9 $19 53% off Lowered for first-time creators.
Related Articles
Faceless UGC Content: How to Create It and Get Paid Without Showing Your Face
How to create faceless UGC content using hands-only demos, screen recordings, and POV shots — plus how to find brands that pay per video.
How to Make a Faceless YouTube Channel: 8-Step Workflow
How to make a faceless YouTube channel: script, AI voiceover, video editing, thumbnails, and YouTube SEO — one repeatable workflow under $30/month.